Blog Best Viewed In Mozilla FireFox


What you can do to speed up your Pc
18 November 2008


What You Can Do to Speed Up Your PC


What You Can Do to Speed Up Your PC


One of the popular topics for discussion on the forums of technology websites is how to fix a slow computer. There are various recommendations given by computer experts to help common users. Some of the suggestions may be easy to implement, while others may require extensive knowledge of computer hardware and software.


Listed below are the easiest ways to maintain the optimal performance and increase the speed of your PC.


Free your Disk Space


It is hard to believe that the huge hard disks that come with computers these days become cramped for space over a period of time. You can free up this space and enhance the overall performance of your PC by using a tool known as Disk Cleanup. This tool helps you locate the files that can be deleted without any effect on computer performance and then allows you to select the files identified from the list.


The following are the files that the Disk Cleanup tool helps you remove:


  • Deleted files stored in Recycle Bin.

  • Temporary Internet Files.

  • Windows components that are optional and not in use.

  • Other program files like Java applets and Microsoft ActiveX controls.


  • Old system restore points.

  • Unwanted programs.


To start freeing your disk space simply click Start >> All Programs >> Accessories >> System Tools >> Disk Cleanup.


Remove Unwanted Programs


A common user may not be aware of the adverse impact of unwanted programs installed on their computers on system speed and performance. These unwanted programs may come along with a new PC or may have been used by you in past and are not in use anymore. Uninstalling these unwanted programs will help you regain access to a lot of disk space and improve its speed.


Given below are two common methods that you can use to uninstall programs, such as remove Yahoo Messenger from your computer.


  1. Start >> Programs. Search for the unwanted Program. Often, you will see a Uninstall Program option under the selected program.


  2. Start >> Settings >> Control panel >> Add/Remove Programs. Just select the programs you would like to uninstall.


Detect Errors in Your Registry and Repair Them


One of the most important components of your computer is the Windows Registry. Since a Windows registry includes critical information about the file associations and device components, any error or presence of invalid entries in it, hampers the performance of your PC and may slow it down. Therefore, it is recommended that you regularly clean your registry.


You can detect and repair errors in your registry by following two methods:


  1. You can clean your registry manually by using a utility known as Regedit, provided in your Windows operating System. However, you must have sound computer knowledge to execute this program and should also take a backup of your registry before taking up the task of cleaning up your registry manually.

  2. Invest in a reliable and compatible registry cleaner vista tool. These tools not only identify all the registry errors, but they also automate the process of scanning and backing up of your Windows registry.


If you follow the above mentioned steps on a regular basis, you should be able to increase the speed of your PC substantially and reduce slow down problems.


Labels:


Computers Blogs - Blog Top Sites Computers Blogs - Blog FlareMy Blog DirectoryPage copy protected against web site content infringement by Copyscape


BookMark me:||del.icio.us || Digg it || Furl || Google || Spurl || Yahoo MyWeb
 
posted by VaTsAl at 8:44 am | Permalink 0 comments
Disable those annoying "X Application has Encountered a Problem and Must be Shut Down" messages in Windows XP
31 January 2008

It's frustrating enough when your application crashes. Then the annoying dialog expects you to "Send an Error Report to Microsoft". As if I want Microsoft to know exactly which programs I'm running on my computer.

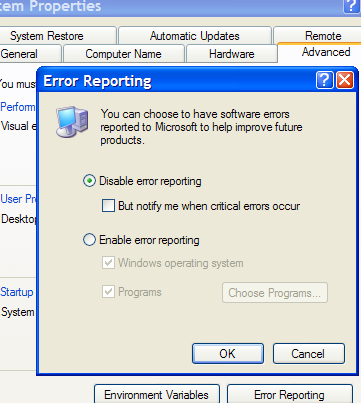
Here's two ways to turn off that error reporting. First, you can Right-Click on My Computer, go to the Advanced Tab, and choose the "Disable error reporting" option.


Alternatively, you can navigate to the services console in Administrative tools, find the Error Reporting Service, go into properties and disable it. Either way, those annoying dialogs are gone!

There it is u are all done n ready

Labels:


Computers Blogs - Blog Top Sites Computers Blogs - Blog FlareMy Blog DirectoryPage copy protected against web site content infringement by Copyscape


BookMark me:||">del.icio.us || ">Digg it || &u=">Furl || ">Google || ">Spurl || &u=">Yahoo MyWeb
 
posted by VaTsAl at 9:18 pm | Permalink 0 comments
Make VLC Player Look like Windows Media Player 11

The VLC Media Player is an open source, cross-platform media client that supports the vast majority of media formats. One of the great features is that it supports skins that work across different platforms. This article will cover installing on both linux and windows.

You will first need to download the skin named WMP11 from theskinspage. This skin looks a lot like Windows Media Player 11. It's not exact, but it's a pretty good skin. N yeah u get that Windows Player Look But oN a much better Player

Labels:


Computers Blogs - Blog Top Sites Computers Blogs - Blog FlareMy Blog DirectoryPage copy protected against web site content infringement by Copyscape


BookMark me:||del.icio.us || Digg it || Furl || Google || Spurl || Yahoo MyWeb
 
posted by VaTsAl at 9:14 pm | Permalink 0 comments
Stopping your system from the 60 second restart
25 December 2007

You can stop a computer from automatically rebooting during the 60 second countdown by doing the following:

1. Head to the Start button
2. Select Run...
3. type shutdown -a in the popup window
4. Select the Ok button to issue the command

Select Recovery tab
Image 1.1: (45KB .jpg)

You can "stop" the Remote Procedure Call Service from shutting down the system after 60 seconds each time the attack is attempted. This does not apply to LSASS.exe. I absolutely do not condone this action as a "fix," but it could be used to stop the system from rebooting while you are attempting to repair the issue and scan your computer for vulnerabilities if you have not already activated your firewall. In an effort to ensure that your system will not be attacked while attempting to solve the problem, disconnect the computer from the internet:

1. Head to the Start button
2. Select Run...
3. type services.msc in the popup window
4. Select the Ok button to issue the command
5. Select the Remote Procedure Call Service from the list by double clicking it
6. Select the "Recovery" tab (Image 1.1)
7. The default for this service is "Restart the Computer" for all failures
8. Change each one to "Restart the Service"
9. Select the Ok button to apply the settings

Again, this should not be done to fix the reboot issue, only to ensure that you have the proper amount of time to correct the problems.

Labels:


Computers Blogs - Blog Top Sites Computers Blogs - Blog FlareMy Blog DirectoryPage copy protected against web site content infringement by Copyscape


BookMark me:||del.icio.us || Digg it || Furl || Google || Spurl || Yahoo MyWeb
 
posted by VaTsAl at 8:55 pm | Permalink 1 comments
Creating a Shutdown/Reboot/Logoff Icon
28 November 2007

WindowsXP has a program called SHUTDOWN.EXE which allows you to easily create icons to shutdown or restart your computer.

To create a shutdown shortcut on the desktop:

Right click on an open area of the desktop
Select New / Shortcut
Enter in "shutdown -s -t 00" - no quotes
Press the Next button
For the name, enter in anything you like. I just use shutdown. Click on the Finish button.

For a reboot, enter "shutdown -r -t 00"
For a logoff, enter "shutdown -l -t 00"


Shutdown [{-l|-s|-r|-a}] [-f] [-m [\\ComputerName]] [-t xx] [-c "message"] [-d[u][p]:xx:yy]

Parameters

-l - Logs off the current user, this is also the defualt. -m ComputerName takes precedence.
-s - Shuts down the local computer.
-r - Reboots after shutdown.
-a - Aborts shutdown. Ignores other parameters, except -l and ComputerName. You can only use -a during the time-out period.
-f - Forces running applications to close.
-m [\\ComputerName] - Specifies the computer that you want to shut down.
-t xx - Sets the timer for system shutdown in xx seconds. The default is 20 seconds.
-c "message" - Specifies a message to be displayed in the Message area of the System Shutdown window. You can use a maximum of 127 characters. You must enclose the message in quotation marks.

Labels:


Computers Blogs - Blog Top Sites Computers Blogs - Blog FlareMy Blog DirectoryPage copy protected against web site content infringement by Copyscape


BookMark me:||del.icio.us || Digg it || Furl || Google || Spurl || Yahoo MyWeb
 
posted by VaTsAl at 9:20 pm | Permalink 0 comments
How to Upgrade Windows 98 or Windows Millennium Edition Profiles to Windows XP Domain User Profiles
23 August 2007

This guide describes how to upgrade a Microsoft Microsoft Windows 98-based, or Microsoft Windows Millennium Edition-based client that has user profiles to a Microsoft Windows XP-based client.

The following steps enable the Windows 98 and Windows Millennium Edition (Me) profiles to be retained throughout the process.

Your best method to retain the profiles is to join the domain during the upgrade installation process.
Otherwise, you must use a workaround method to transfer the profile information over to the Windows XP profile.

During the upgrade installation process, at the networking section, the administrator is offered the choice to join a domain or a workgroup.
If you join the domain at this juncture, you ensure that all the existing profiles are migrated successfully to the Windows XP-based installation.

If you did not join the computer to the domain during the upgrade process, you must use the following workaround method:

Join the upgraded computer to the target domain.

All applicable users must log on and log off (which generates a profile).

Copy the appropriate Application Data folder from the Windows 95, Windows 98, and Windows Me profiles to the newly created user profiles.

Labels: ,


Computers Blogs - Blog Top Sites Computers Blogs - Blog FlareMy Blog DirectoryPage copy protected against web site content infringement by Copyscape


BookMark me:||del.icio.us || Digg it || Furl || Google || Spurl || Yahoo MyWeb
 
posted by VaTsAl at 8:58 pm | Permalink 0 comments
AVI File Fix in Windows XP

If you have any AVI files that you saved in Windows 9x, which have interference when opened in Windows XP, there is an easy fix to get rid of the interference: Open Windows Movie Maker. Click View and then click Options. Click in the box to remove the check mark beside Automatically create clips. Now, import the movie file that has interference and drag it onto the timeline. Then save the movie, and during the re-rendering, the interference will be removed.

Labels: ,


Computers Blogs - Blog Top Sites Computers Blogs - Blog FlareMy Blog DirectoryPage copy protected against web site content infringement by Copyscape


BookMark me:||del.icio.us || Digg it || Furl || Google || Spurl || Yahoo MyWeb
 
posted by VaTsAl at 2:12 am | Permalink 1 comments
For a Safer, faster XP Close Unwanted Services
21 August 2007

To disable unneeded startup services for a safer, faster XP, use the "Services" Admin Tool (Control Panel > Administrative Tools > Services). If you are a single user of a non-networked machine, you can disable the following items, with no ill effect.

Alerter
Clipbook
Computer Browser
Fast User Switching
Human Interface Access Devices
Indexing Service (Slows the hard drive down)
Messenger
Net Logon (unnecessary unless networked on a Domain)
Netmeeting Remote Desktop Sharing (disabled for extra security)
Remote Desktop Help Session Manager (disabled for extra security)
Remote Procedure Call Locator
Remote Registry (disabled for extra security)
Routing & Remote Access (disabled for extra security)
Server
SSDP Discovery Service (this is for the utterly pointless "Universal P'n'P", & leaves TCP Port 5000 wide open)
TCP/IP NetBIOS Helper
Telnet (disabled for extra security)
Universal Plug and Play Device Host
Upload Manager
Windows Time
Wireless Zero Configuration (for wireless networks)
Workstation

Labels:


Computers Blogs - Blog Top Sites Computers Blogs - Blog FlareMy Blog DirectoryPage copy protected against web site content infringement by Copyscape


BookMark me:||del.icio.us || Digg it || Furl || Google || Spurl || Yahoo MyWeb
 
posted by VaTsAl at 8:02 pm | Permalink 0 comments
Want to keystroke ur entire desktop and even more...
19 August 2007

Launchy is a free windows utility designed to help you forget about your start menu, the icons on your desktop, and even your file manager.

Launchy indexes the programs in your start menu and can launch your documents, project files, folders, and bookmarks with just a few keystrokes!


To download launchy go here

Labels:


Computers Blogs - Blog Top Sites Computers Blogs - Blog FlareMy Blog DirectoryPage copy protected against web site content infringement by Copyscape


BookMark me:||del.icio.us || Digg it || Furl || Google || Spurl || Yahoo MyWeb
 
posted by VaTsAl at 1:18 pm | Permalink 0 comments
Make Windows XP Start Faster
16 August 2007

Most of the time you install an application in Windows XP, it adds an entry to the list of programs which autostart when Windows XP boots up. As time progresses, this list keeps on growing making Windows XP boot slow.


The solution
SysInternals Autorun is a nifty utility to track down the notorious programs which run at start-up and slow down the booting of Windows XP.

This utility, which has the most comprehensive knowledge of auto-starting locations of any startup monitor, shows you what programs are configured to run during system bootup or login, and shows you the entries in the order Windows processes them. These programs include ones in your startup folder, Run, RunOnce, and other Registry keys.

It also has an option to hide signed Microsoft entries to help you to zoom in on third-party auto-starting images that have been added to your system.


If you want to disable an auto-start entry uncheck its check box. To delete an auto-start configuration entry use the Delete menu item or toolbar button.

So go ahead and make your Windows XP faster..


Download SysInternals Autorun

Labels:


Computers Blogs - Blog Top Sites Computers Blogs - Blog FlareMy Blog DirectoryPage copy protected against web site content infringement by Copyscape


BookMark me:||del.icio.us || Digg it || Furl || Google || Spurl || Yahoo MyWeb
 
posted by VaTsAl at 4:26 pm | Permalink 0 comments
Disable Automatic Delivery Of IE7 Via Automatic Updates

Don't want to install IE7 but are bugged by Windows Update everytime ?

After the release of Internet Explorer 7, Microsoft started distributing IE7 as high-priority update via Automatic Updates for Windows XP and Windows Server 2003. But there are still some Windows customers who want to stick with Internet Explorer 6 and do not want to see those nagging screens from Microsoft to install Internet Explorer 7.

Here is how you can block the install of IE7 via Windows Update while getting other important updates.
How To Block Automatic Delivery Of IE7
Microsoft has released a toolkit to disable the automatic install of IE7 via Automatic Updates while enabling the customer to get other updates via Automatic Updates.

The Internet Explorer 7 Blocker Toolkit enables IT Administrators to disable automatic delivery of Internet Explorer 7 as a high-priority update via Automatic Updates and the Windows Update and Microsoft Update sites.


The toolkit download requires genuine Windows validation and allows you to easily enable or disable the automatic installation of Internet Explorer 7 by Microsoft Automatic Updates on your XP or 2003 operating system.


Download the toolkit

Labels:


Computers Blogs - Blog Top Sites Computers Blogs - Blog FlareMy Blog DirectoryPage copy protected against web site content infringement by Copyscape


BookMark me:||del.icio.us || Digg it || Furl || Google || Spurl || Yahoo MyWeb
 
posted by VaTsAl at 4:17 pm | Permalink 0 comments
How to turn on automatic logon in Windows XP
9 August 2007

ou can use Registry Editor to add your log on information. To do this, follow these steps:
1. Click Start, click Run, type regedit, and then click OK.
2. Locate the following registry key:
HKEY_LOCAL_MACHINE\SOFTWARE\Microsoft\WindowsNT\CurrentVersion\Winlogon
3. Using your account name and password, double-click the DefaultUserName entry, type your user name, and then click OK.
4. Double-click the DefaultPassword entry, type your password under the value data box, and then click OK.

If there is no DefaultPassword value, create the value. To do this, follow these steps:
a. In Registry Editor, click Edit, click New, and then click String Value.
b. Type DefaultPassword as the value name, and then press ENTER.
c. Double-click the newly created key, and then type your password in the Value Data box.
If no DefaultPassword string is specified, Windows XP automatically changes the value of the AutoAdminLogon registry key from 1 (true) to 0 (false) to turn off the AutoAdminLogon feature.
5. Double-click the AutoAdminLogon entry, type 1 in the Value Data box, and then click OK.

If there is no AutoAdminLogon entry, create the entry. To do this, follow these steps:
a. In Registry Editor, click Edit, click New, and then click String Value.
b. Type AutoAdminLogon as the value name, and then press ENTER.
c. Double-click the newly created key, and then type 1 in the Value Data box.
6. Quit Registry Editor.
7. Click Start, click Restart, and then click OK.
After your computer restarts and Windows XP starts, you can log on automatically.

If you want to bypass the automatic logon to log on as a different user, hold down the SHIFT key after you log off or after Windows XP restarts. Note that this procedure applies only to the first logon. To enforce this setting for future logoffs, the administrator must set the following registry key:
HKEY_LOCAL_MACHINE\SOFTWARE\Microsoft\WindowsNT\CurrentVersion\Winlogon

Value:ForceAutoLogon
Type: REG_SZ
Data: 1
You can also use turn on automatic logon without editing the registry in Microsoft Windows XP Home Edition and in Microsoft Windows XP Professional on a computer that is not joined to a domain. To do this, follow these steps:
1. Click Start, and then click Run.
2. In the Open box, type control userpasswords2, and then click OK.

Note When users try to display help information in the User Accounts window in Windows XP Home Edition, the help information is not displayed. Additionally, users receive the following error message:
Cannot find the Drive:\Windows\System32\users.hlp Help file. Check to see that the file exists on your hard disk drive. If it does not exist, you must reinstall it.
3. Clear the "Users must enter a user name and password to use this computer" check box, and then click Apply.
4. In the Automatically Log On window, type the password in the Password box, and then retype the password in the Confirm Password box.
5. Click OK to close the Automatically Log On window, and then click OK to close the User Accounts window

Labels:


Computers Blogs - Blog Top Sites Computers Blogs - Blog FlareMy Blog DirectoryPage copy protected against web site content infringement by Copyscape


BookMark me:||del.icio.us || Digg it || Furl || Google || Spurl || Yahoo MyWeb
 
posted by VaTsAl at 5:19 pm | Permalink 0 comments
A tweak to boost up network application performance. Change thread priority
19 June 2007

You can change the priority of applications as soon as associated IO tasks are completed. Microsoft TCP/IP Stack component AFD.SYS allows you to do this. You can read all about it at http://rdweb.cns.vt.edu/public/notes/tcpip2000.pdf Again this is a registry tweak and works well with XP.Open Registry by going to START-RUN and entering REGEDIT and Navigate to [HKEY_LOCAL_MACHINE\SYSTEM\CurrentControlSet\Services\AFD\Parameters] and set the following key values to the values shown.
"TransmitWorker"=dword:00000010
"PriorityBoost"=dword:0000000a

Labels:


Computers Blogs - Blog Top Sites Computers Blogs - Blog FlareMy Blog DirectoryPage copy protected against web site content infringement by Copyscape


BookMark me:||del.icio.us || Digg it || Furl || Google || Spurl || Yahoo MyWeb
 
posted by s я ϊ я α м . at 2:09 pm | Permalink 0 comments
Improve computer performance by reducing EFS cache validation


Navigate to HKLM\System\CurrentControlSet\Services\NTFS\EFS\Parameters and set the parameter of EFSKCACHEPERIOD to a value between 2 and 30. default is 5. Value suggest the time in seconds the kernel will cache the session key for a user for a given file. The Kernel will not validate the user credentials during this cache period. This has the net effect of faster access to encrypted files that may be opened several times during a given time period.This is helpful in kernel and user mode of the EFS (encrypting file system) as it provides quicker access to frequently use components.
Similarly navigate to HKLM\Software\Microsoft\Windows NT\CurrentVersion\EFS and set the value of KeyCacheValidationPeriod to a value in units of second from 1 minute to 1 day (60 to 86400).

Microsoft has an interesting article on this at Registry Keys Used to Tune EFS Caching (Q278256). Read it for complete details.

Labels:


Computers Blogs - Blog Top Sites Computers Blogs - Blog FlareMy Blog DirectoryPage copy protected against web site content infringement by Copyscape


BookMark me:||del.icio.us || Digg it || Furl || Google || Spurl || Yahoo MyWeb
 
posted by s я ϊ я α м . at 1:55 pm | Permalink 0 comments
Do You want Windows to unload dll immediately?

Folks, I read about this a long time ago and my preliminary findings are that it works on XP as well even though I can not say how beneficial this trick is (or how damaging !). Also there might be some potential problems with a a few apps. But I would still provide it to You There is a way in registry for You to tell Windows OS to unload DLL,immediately as soon as its use is over. Here is how to do that: . Open Registry by going to START-RUN and entering REGEDIT and Navigate to [HKEY_LOCAL_MACHINE\Software\Microsoft\Windows\CurrentVersion\Explorer] and look for AlwaysUnloadDLL parameter. It may not be present by default. If not, add a key by the name AlwaysUnloadDLL and set it to value of 1.

This would inform OS to unload the DLL files from memory immediately. This has its advantages and disadvantages. It may also crash some Microsoft applications (like Access).

Labels:


Computers Blogs - Blog Top Sites Computers Blogs - Blog FlareMy Blog DirectoryPage copy protected against web site content infringement by Copyscape


BookMark me:||del.icio.us || Digg it || Furl || Google || Spurl || Yahoo MyWeb
 
posted by s я ϊ я α м . at 1:55 pm | Permalink 0 comments
Reduce IO and increase turnaround which means faster computer !

Open Registry by going to START-RUN and typing REGEDIT. Navigate to [HKEY_LOCAL_MACHINE\SYSTEM\CurrentControlSet\Control\Session Manager\Memory Management\IoPageLockLimit. Depending upon how much RAM you have, you can increase your diskcache size by entering a higher value in IoPageLockLimit. Typically your computer won't come optimized for diskcache and you can set to a value which works best for you by trial and error.Rule of thumb is to have a ratio of 1 or 2 for every 64K chuck. But try out various different values as each case would be a little different

Labels:


Computers Blogs - Blog Top Sites Computers Blogs - Blog FlareMy Blog DirectoryPage copy protected against web site content infringement by Copyscape


BookMark me:||del.icio.us || Digg it || Furl || Google || Spurl || Yahoo MyWeb
 
posted by s я ϊ я α м . at 1:39 pm | Permalink 0 comments
Yet another tip to increase your browsing speed in XP
12 June 2007

Here's a great tip to speed up your browsing of Windows XP machines. Its actually a fix to a bug installed as default in Windows 2000 that scans shared files for Scheduled Tasks. And it turns out that you can experience a delay as long as 30 seconds when you try to view shared files across a network because Windows 2000 is using the extra time to search the remote computer for any Scheduled Tasks. Note that though the fix is originally intended for only those affected, Windows 2000 users will experience that the actual browsing speed of both the Internet & Windows Explorers improve significantly after applying it since it doesn't search for Scheduled Tasks anymore. Here's how :

Open up the Registry and go to :

HKEY_LOCAL_MACHINE/Software/Microsoft/Windows/Current Version/Explorer/RemoteComputer/NameSpace

Under that branch, select the key :

{D6277990-4C6A-11CF-8D87-00AA0060F5BF}

and delete it.

This is key that instructs Windows to search for Scheduled Tasks. If you like you may want to export the exact branch so that you can restore the key if necessary.

This fix is so effective that it doesn't require a reboot and you can almost immediately determine yourself how much it speeds up your browsing processes.

Labels:


Computers Blogs - Blog Top Sites Computers Blogs - Blog FlareMy Blog DirectoryPage copy protected against web site content infringement by Copyscape


BookMark me:||del.icio.us || Digg it || Furl || Google || Spurl || Yahoo MyWeb
 
posted by s я ϊ я α м . at 9:51 pm | Permalink 0 comments
XP Power Tools ..

What are XP powerToys?

PowerToys are additional programs that developers work on after the product has been released to manufacturing, but before the next project has begun. These toys add fun and functionality to the Windows experience.

We've taken great care to ensure that PowerToys operate as they should. But please note that these programs are not part of Windows and are not supported by Microsoft. For this reason, Microsoft Technical Support is unable to answer questions about PowerToys

The PowerToys are installed into the directory you specify during setup. Typically this is the system32 directory.

To uninstall the PowerToys, Open the control Panel. Launch the Add/Remove Programs control panel applet. Find the PowerToys for Windows XP entry, and choose Modify/Remove. From here you can remove specific toys or all of them.

Faster User Switcher
Note: You cannot use this toy if fast user switching is not enabled.

What it is: With Fast User Switching enabled on Windows XP, this PowerToy allows you to switch users without having to use the logon screen.
Special requirements: This PowerToy requires a Windows key on your keyboard.
How to use: Press the Windows key then the Q key to activate; release and press Q to switch to a different user tile, then release both Q and Windows key to switch to that user.


Shell Player
What it is: This PowerToy plays MP3 files and WMA files from the taskbar.
How to use: Right click on the taskbar, click toolbars, then click "Audio Player." If the taskbar is locked and you want to resize the player, you will have to unlock it. This will allow you to access the play list editor and view all the buttons.


Task Switcher
What it is: Replaces the existing Alt + Tab application switching mechanism of Windows XP. It provides a thumbnail preview of windows in the task list and is compliant with the new Windows XP visual style.
How to use: (NOTE: You must log off and then log on again for the changes to take effect). Use just as you do the existing Alt + Tab mechanism by pressing the Alt key and the Tab key to activate. While holding down the Alt key, press the Tab key to cycle through running applications. To move backwards, press Shift + Alt + Tab. Release all keys when the desired application is highlighted.


Open Command Window Here
What it is: This PowerToy adds an "Open Command Window Here" context menu option on file system folders. This gives users a quick way to open a command window (cmd.exe) pointing at a selected folder in the Explorer UI.
How to use: After installation, right click on the folder you would like to have a quick launch command window for.

Tweak UI
What it is: Provides access to system settings that are not exposed in the Windows XP default user interface.
How to use: Go to Start, All Programs, Accessories, TweakUI for Windows XP.

PowerToy Calc
What it is: Graphing calculator
How to use: Go to Start, All Programs, Accessories, PowerToy Calc

Bulk Resize for Photos
What it is: Allows you to make a new, resized copy of your selected pictures in the same folder they are currently located in. You can opt to resize one or many pictures (as a batch).
How to use: Right click any image(s) and select Resize Pictures in the context menu.

ISO Image Burner
What it is: Allows you to burn an ISO Image using a CD-ROM burner that is compatible with Windows XP
How to use: Go to Start, All Programs, Accessories, ISO Burner


Slide Show Generator
What it is: Generate a slideshow when burning a CD
How to use: Add only images to a CD-ROM using Windows XP Explorer, then Write these files to disk. A new task is presented in the wizard for generating the autorun for the slideshow.

Virtual Desktop Manager
What it is: Manage up to 4 desktops from the Windows Shell Taskbar.
How to use:Right click on the taskbar, click toolbars, then click "Desktop Manager." If the taskbar is locked and you want to resize the manager, you will have to unlock it.

Background Wallpaper switcher
What it is: Allows you to switch the background image periodically.
How to use: Access this PowerToy by right clicking the desktop, click properties. It has added a new tab that will allow you to specify the interval as well as the directory to obtain the images from.

Taskbar Magnifier
What it is: Allows you to magnify part of the screen from the taskbar.
How to use:Right click on the taskbar, click toolbars, then click "Taskbar Magnifier." If the taskbar is locked and you want to resize the magnifier, you will have to unlock it.

Slide Show Wizard
What it is: This wizard helps you create a slide show of your digital pictures. When you're done, you can put your slide show on the Web so that your family and friends can view it.
How to use: Launch the Wizard from the Start Menu under All ProgramsPowertoys for Windows XPSlide Show Wizard. Follow the steps of the wizard to select and arrange your pictures, choose from a few simple options, and then save a Web-ready HTML slide show to a folder.

Labels:


Computers Blogs - Blog Top Sites Computers Blogs - Blog FlareMy Blog DirectoryPage copy protected against web site content infringement by Copyscape


BookMark me:||del.icio.us || Digg it || Furl || Google || Spurl || Yahoo MyWeb
 
posted by s я ϊ я α м . at 9:43 pm | Permalink 0 comments
How to Increase the Folder Cache

The default setting for WindowsXP is to cache the Explorer settings for 400 folders.
To increase it:

  1. Start Regedit
  2. Go to HKEY_CURRENT_USER\Software\Microsoft\Windows\ShellNoRoam
  3. Change the vaule of BagMRU to whatever size you want (hex)

1000 - 3e8
2000 - 7d0
3000 - bb8
4000 - fa0
5000 - 1388

Labels:


Computers Blogs - Blog Top Sites Computers Blogs - Blog FlareMy Blog DirectoryPage copy protected against web site content infringement by Copyscape


BookMark me:||del.icio.us || Digg it || Furl || Google || Spurl || Yahoo MyWeb
 
posted by s я ϊ я α м . at 9:27 pm | Permalink 0 comments
10 useful VISTA tips .
23 May 2007

1. Power Button Default Action

The default action for the Power button on the start menu in Windows Vista is Sleep, which isn’t necessarily useful for everybody. You can configure this setting easily by using the advanced power settings panel, which is a little tricky to get to normally, but we’ll take the shortcut. Open a command prompt (type cmd into the start menu search bar), and then type in the following: powercfg.cpl,1. You could also take the long route (Control Panel Power Options Change Plan Settings Change Advanced Power Settings) Once you get to this dialog, browse down as shown to “Power buttons and lid”

From here, you can change the options:

  • Power button action - Changes the hardware power button action
  • Start menu power button - Changes the power button on the Start Menu
You can change the power button to either Sleep, Hibernate or Shut Down, or even nothing for the hardware power button.

2. Hide Desktop Icon Text on Windows Vista

Some icons are just obvious enough that nobody should need text below them to tell them what the icon is for. A good example of this is the icon for Internet Explorer. We’re all really used to it by now, and the text just makes it ugly. Just right-click on the shortcut, and choose Rename. Now hold down the Alt key and type in 255 on the keypad to the right of the keyboard. You can’t use the number keys right above the keyboard, they won’t work. If you have a laptop, you can turn on numlock and then use the little number keys next to the regular letters. (You know you always wondered what they were for)

For the first shortcut on the desktop, a simple Alt+255 will do. For the next shortcut, you’ll have to enter the combination twice (Alt+255, Alt+255). For the third, 3 times… you get the idea. The way this works is that the Alt+255 character is blank, so the shortcut filename is actually just named with a character that is completely blank. Since you can’t have two shortcuts or files named the exact same thing, the second shortcut will have to be named with two blank characters.

Now we have a sweet looking icon on the desktop, with no bothersome text beneath it. If you use this tip to rename a folder, you will not be able to rename the folder back using the right-click rename. I’m not sure why this is. What you’ll have to do is open a command prompt and change directory into the containing folder (For instance, the desktop folder), and run this command: ren “Alt+255” “NewFolderName” You will need to actually type the Alt+255 characters where illustrated in the command. It will appear as a space. Note that the Recycle Bin icon won’t work this way.

3. Enable Hidden BootScreen in Windows Vista

The Windows Vista BootScreen is pointless, but Microsoft decided to hide a more visually appealing boot screen that can easily be enabled with very little trouble. I’m not sure why they didn’t make the boot screen better.

  1. Press Win+R, type msconfig and press Enter.
  2. If User Account Control prompts you to allow the action, click on Continue.
  3. In the "System Configuration" window, click on the Boot tab.
  4. Select your Windows Vista installation and under "Boot options", check "No GUI boot". Press OK.
  5. In the dialog that appears, check "Don’t show this message again", and then click on Restart.
  6. Your computer will now reboot, and you will see the Aurora boot screen with text that says "Starting Windows Vista".

Note: You may get a Windows Defender error on the next startup. You can enable the system config utility using the tray icon and this error will go away.

4. Fix for COM Surrogate Has Stopped Working Error in Vista

If you’ve been getting the error COM Surrogate has stopped working whenever you browse folders containing Divx avi files, it looks like the latest Divx update to codec version 6.5 fixes the issue, but it also seems to remove the thumbnails. If you want to upgrade, just use the divx update checker to grab the new version. Looks like it’s finally fixed, at least the error message is now gone, although I really wish they would have just gotten the thumbnails working instead.

  • If you are using Nero, you will need to update to version 7.7.5.1 to fix the problem. I think this is the source of the error for most people.
  • If you’ve upgraded Nero and Divx and still have the problem, you can try renaming the file C:Program FilesCommon FilesAheadDSFilterNeVideo.ax to NeVideo.ax.bak This will break Nero Showtime, however.

5. Stop an Application from Running at Startup in Windows Vista

Back in the old days, there were a lot of places an application could hook itself to run at startup. You had to check the registry in more than one place, as well as your start menu. With Windows Vista, there’s a built-in panel that handles all that for you. To quickly get to this panel, you can open Control Panel, and then type “startup” into the search box. The link for “Stop a program from running at startup” shows up immediately. You could have also opened Windows Defender and fooled around with the menus until you find the right spot, but this seems quicker to me. Now you can see the Windows Defender screen that lets you manage the startup programs. You can choose to Remove or just Disable any startup item using this panel, as well as lots of other useful information so that you can see what each item is.

6. Emptying Windows Vista Temp Files Directory

Windows Vista Disk Cleanup wizard is really not all that bad, but I did find a small problem with it… It doesn’t fully empty your temp folder. It only allows you to delete temporary files that haven’t been modified in a week. If you’ve recently done a lot of editing or something that generates large temporary files, you may want to manually clean up. Just type in %TEMP% into the start menu search box, and hit enter. You’ll immediate be taken to the temporary files folder, where you can delete whatever you feel like.

7. Disable User Account Control (UAC) For Administrators Only

If you can’t stand the User Account Control prompts, but you’d still like to retain a little bit of security, you can disable it for Administrator accounts only. What we’ll be doing is actually changing Windows Vista to automatically elevate the privilege level for administrators without prompting. The nice thing about doing it this way is that regular users as well as Internet Explorer still run as regular users, and would still use the normal security mechanisms. To configure this setting on Windows Vista Business and Ultimate, you can use the Local Security Policy configuration.

  • Just type in secpol.msc into the Start menu search box and hit enter.
  • Now browse down to Local Policies Security Options
  • Find the following in the list: “User Account Control: Behavior of the elevation prompt for administrators in Admin Approval Mode” and double-click on it.
  • Change the setting to “Elevate without prompting”. You should be all done.
This is an easier method that you can use to do the same thing from the GUI interface.
  • Open up Control Panel, and type in user account into the search box.
  • You’ll see the link for “Turn User Account Control (UAC) on or off”. Click it.
  • Uncheck the box, and reboot your computer. You should be done with obnoxious prompts!

8. Using Windows Vista System Restore

Windows Vista has a feature called System Restore that automatically backs up registry and system files whenever you install new software or drivers. This feature is useful when you install evil software that makes your computer run really slow. But don’t worry, System Restore won’t remove Windows Vista.

Using System Restore in Windows Vista:

There are two places that you can use the system restore feature from. From within Windows, you can just type restore into the Start menu search box, and you’ll immediately see System Restore at the top of the start menu, or you can type rstrui into the search box and hit enter. Your choice. You will immediate see a screen where you can choose to roll back the system to the last restore point. You can select “Recommended restore”, and just click next, or you can choose a different restore point. If you do choose a different restore point, you will see a list of restore points that you can choose from. Click one of them, and you will have to confirm and then restart your computer to roll the system back. If your system won’t boot If you can’t even get into windows, you can boot off the installation dvd, and choose the “Repair your computer” option on the lower left hand side. Click next on the next screen. Now choose System Restore from the System Recovery dialog. It will take a few seconds to come up, and you will see the same screen that you would see in Windows. Click next, and on the next screen select the drive that your copy of Windows Vista is installed on. Click Finish, and Vista will roll back to the previous restore point. Really pretty simple stuff. I absolutely recommend keeping the system restore feature on in Vista !

9. Verify the Integrity of Windows Vista System Files

Windows Vista includes a utility that will scan your system for corrupt, changed or missing system files. Running this from the command prompt is much easier than booting off the dvd into repair mode. To run this utility, you will need to open a command prompt in administrator mode. You can do that by right clicking the Command Prompt in the list and choose "Run as Administrator" Once you have an administrator command prompt open, you can run the utility by using the following syntax: SFC [/SCANNOW] [/VERIFYONLY] [/SCANFILE=] [/VERIFYFILE=] [/OFFWINDIR= /OFFBOOTDIR=] The most useful command is just to scan immediately, which will scan and attempt to repair any files that are changed or corrupted. You can run that command with this command: sfc /scannow

10. Disable Hibernation & Delete the Hibernation File

Windows places a file on your hard drive that it uses when your computer goes into hibernation mode. If you do not use hibernation mode, or your computer does not properly support it, you may want to disable hibernation and clear the file off your hard drive to free up some space (the file will use as much space as you have in physical memory, so if you have 1GB of RAM, it’s going to use 1GB of your hard drive space).

Disable Hibernation:
1. Click Start, All Programs, and then right click on "Command Prompt".
2. From the context menu click on "Run as administrator".
3. If User Account Control prompts you to allow the action, click on Continue.
4. In the command prompt window, type "powercfg –h off" (without the quotes).
5. Close the Command Prompt window.

Delete the Hibernation File:
1. Click Start, All Programs, Accessories, System Tools, and then click "Disk Cleanup".
2. If prompted to choose a drive, select the drive in which Windows Vista is installed on to and press OK.
3. Disk Cleanup will scan the hard drive and present you with a list of options.
4. Check "Hibernation File Cleaner", and then click OK.
5. When asked "Are you sure you want to permanently delete these files?" click on the Delete Files button .


..THE END :D

Labels:


Computers Blogs - Blog Top Sites Computers Blogs - Blog FlareMy Blog DirectoryPage copy protected against web site content infringement by Copyscape


BookMark me:||del.icio.us || Digg it || Furl || Google || Spurl || Yahoo MyWeb
 
posted by s я ϊ я α м . at 8:02 am | Permalink 0 comments